The customizing of the SeaCure mouthpiece takes place before mounting on the regulator. Please read all of the following instructions carefully and completely before proceeding.
Before beginning the molding process, place the yellow plug in the regulator opening of the mouthpiece (end with the bite limiter, which is the long, thin tab, into the mouthpiece) to use as a handle during the molding process. Then, assemble the following materials:
– 3-quart saucepan (at least 6″ in diameter and 4″ deep)
– Sharp pair of scissors
– Mirror
Step 1
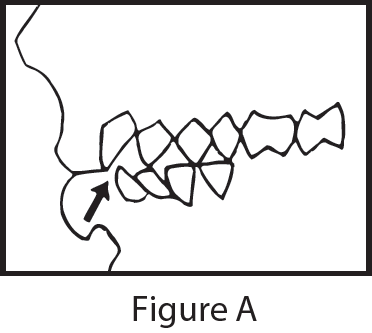
Unlike conventional mouthpieces, the SeaCure mouthpiece must fit your mouth and jaw configuration precisely since it has a specific top and bottom position. Most people’s upper teeth are slightly forward of their lower teeth when the jaw is closed (see Figure A).
If your bite is this way, the surface of the mouthpiece imprinted with the word “SeaCure” (see Figure B) should be positioned facing DOWNWARD, both in the molding process and in mounting the mouthpiece to your regulator.
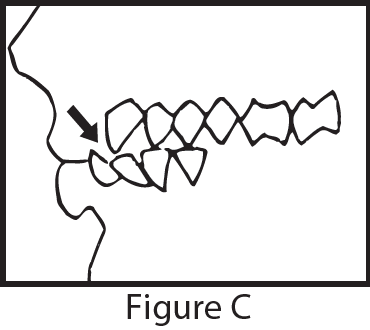
However, some people’s lower teeth extend in front of their upper teeth when the jaw is closed (see Figure C). If this is true for you, the SeaCure imprinted surface of the mouthpiece should be positioned facing UPWARD for both molding and mounting. Note: This positioning is very important for maximum comfort and effectiveness when diving!
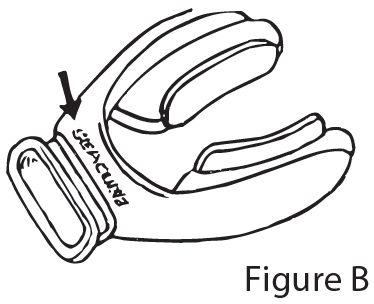
Note the position of the word SeaCure.
If your bite is this way, the surface of the mouthpiece imprinted with the word “SeaCure” (see Figure B) should be positioned facing DOWNWARD, both in the molding process and in mounting the mouthpiece to your regulator.
If your bite is this way, the SeaCure imprinted surface of the mouthpiece should be positioned facing UPWARD for both molding and mounting.
Step 2
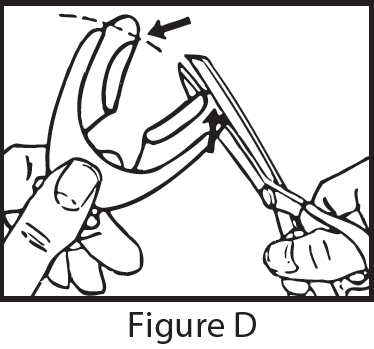
Having determined the proper positioning for your jaw, try your SeaCure mouthpiece in your mouth just to get a feel for how it goes in. AT THIS POINT THE UNIT HAS NOT BEEN MOLDED AND WILL NOT YET FEEL COMFORTABLE. You will note that unlike conventional mouthpieces, SeaCure extends back to include all of your teeth. If the bite wing tips touch the back of your mouth behind the last teeth to the point of discomfort, take a sharp pair of scissors and trim off a small portion of each bite wing tip (see Figure D). Note: Cut off only about 1/8th inch of the tips at a time! Retry the mouthpiece in your mouth before trimming more! Trim only enough to clear the back of your mouth!
Step 3
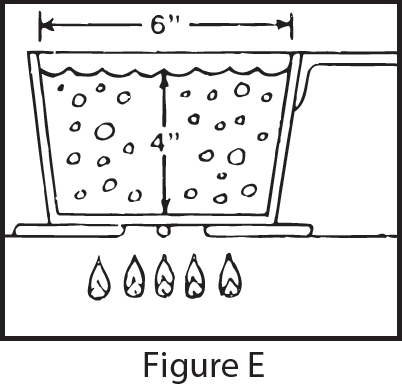
In a three-quart saucepan or a pan at least 6 inches in diameter and deep enough to hold 4 inches of water (see Figure E), fill with water to at least 4-inch depth. Bring water to a vigorous or rolling boil. Remove from heat and let water sit a few moments until the bubbling stops.
Step 4
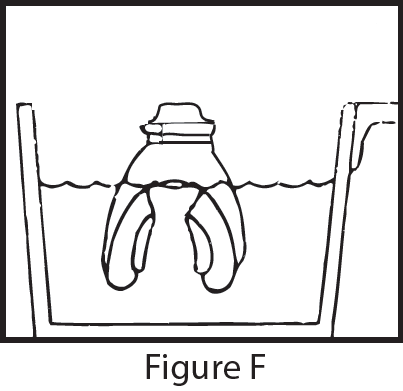 Holding the mouthpiece with the plug and with the bite tips pointed down, submerge the bite portion into the hot water up to the top of the bite piece area (see Figure F). DO NOT PUT THE REGULATOR END INTO THE WATER! DO NOT IMMERSE THE ENTIRE MOUTHPIECE! Hold the mouthpiece in this immersed position for 15 seconds. Note: For Size 4 and Size 5 mouthpieces, hold the mouthpiece in the immersed position for only 12 seconds. Do not heat the mouthpiece beyond the recommended time. Remove from water. SHAKE THREE TIMES TO REMOVE EXCESS WATER. Do not place the mouthpiece in your mouth if hot water remains on it.
Step 5
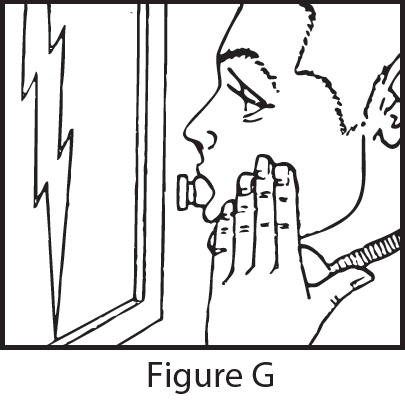
Immediately place the SeaCure mouthpiece in your mouth with the word “SeaCure” properly positioned (see Step 1) and perform the following three steps together, working in front of a mirror to be sure the mouthpiece is centered under your nose:
1. BITE DOWN FIRMLY. The bite limiter on the yellow plug will limit closure. It is not necessary for your teeth to hit the bite limiter when molding. It is only there to prevent over closure.
2. While setting your teeth, press the inner portion of the bite wings against the inside of your teeth with your tongue
3. At the same time, press the outer edges of the bite wings against your teeth and gums by pressing your fingers against your cheeks (see Fig G).
The SeaCure mouthpiece is now custom-molded to your teeth and gums. Note: Because of anatomical variation, if you do not see impressions of all of your back teeth, cool the mouthpiece back to room temperature and remold it without the bite limiter.
The SeaCure Custom Mouthpiece is remoldable! If you are not entirely satisfied with the initial fit, simply repeat Steps 3 through 5, making sure the unit is cold (room temperature) before remolding.
DO NOT REMOLD IMMEDIATELY FOLLOWING ANY PREVIOUS MOLDING WITHOUT FIRST THOROUGHLY COOLING THE SeaCure MOUTHPIECE!
Repeat as necessary to achieve a comfortable fit. This remolding process can be done at any time should you have dental work done or if, for any reason, your bite changes.
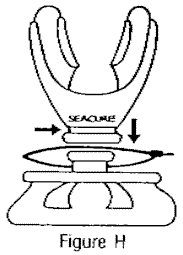
Your personalized SeaCure Custom Mouthpiece is now ready to be placed on your regulator, using the plastic tie provided. To install, remove the plug, then put the mouthpiece, properly oriented (see Step 1), onto the flange of your regulator. Because of the rigid design of SeaCure, it may take a little effort to place it on your regulator. Once the mouthpiece is properly seated with the regulator lip seated in the internal mouthpiece groove, place the plastic tie around the mouthpiece in the groove (see Fig. H). Tighten securely. Cut off excess. To remove your mouthpiece from the regulator, grasp the lockbox of the plastic tie with a pair of cutting pliers, twist to remove the tie, then remove the mouthpiece from the regulator flange
The unique moldability of a SeaCure mouthpiece that provides the comfortable custom fit, results from its heat sensitivity. While the unit is particularly sturdy in normal use, some extra care is advised when handling your SeaCure if it is subjected to excessive or prolonged heat.